Showing posts with label brooch. Show all posts

Thursday, June 13, 2013

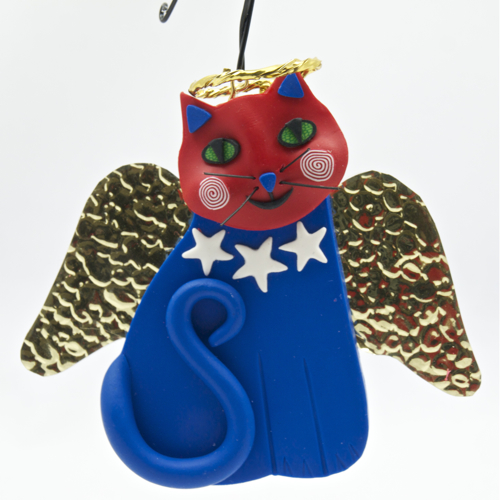
Patriotic Cat Necklace and Ornament for Fourth of July - Independence Day, Flag Day celebrates the USA and Freedom in Red, White and Blue polymer clay


Our newest cat necklace is a Red, White and Blue Patriotic Cat that's designed in honor of the USA and celebrates the freedom we enjoy in our country. It also honors the founding fathers and those who gave their lives in the name of freedom, as well as all those in the military and their families. The Patriotic Angel Cat version seen above is a hanging ornament decoration version that's equally at home dangling on a computer in an office cubicle, hanging off a potted plants, or sitting in a window.

It's also available as a decorative magnet that's a cheerful way of attaching important notes to the refrigerator.

 The Patriotic Cat is also available in a necklace version with a red, white and blue beaded chain........

 ............and in a necklace version with a silky cord and a clever finding that allows one to slip out the cord and wear it as a brooch.


All the Patriotic kitties, as well as many other cat themed pieces are available at MelodyODesigns at Etsy


Tuesday, March 19, 2013

New Hound Dog Necklace joins the Cats and the angst of his prototype birthing process.

The various Hound Dog pieces are available for sale from MelodyODesigns at Etsy
A winsome French blue and lavender Hound Dog pendant necklace that converts to a brooch is the newest addition to our polymer clay jewelry menagerie. After making cat jewelry and ornaments for many years, it only seemed fair that the doggie segment of the population should be honored as well. I've tried numerous times over the years to make a dog companion for the kitties and had always failed before. I think that was because a cat is pretty much a cat, but there are so many breeds of dogs in all sizes and configurations it's hard to make a generic dog. What I did this time was to design a fantasy dog with no particular breed in mind and components of many breeds all mixed together to make him a real Heinz 57 special. What I ended up with was a French blue and lavender pup with long floppy ears, a big nose and a soulful expression that sort of looks like there might have been a bit of Hound, Beagle or Spaniel in his heritage. For some unknown reason, it seems to me that this dog loves jazz, eating hot dogs off the kitchen counter, the New York Yankees and of course, his new prospective owner. 

Hound Dog Pendant Necklace converts to a Brooch
He and I had a some quality time together getting to know each other during the two 15 hour days in my studio it took to design him and get him ready for production. In a discussion about inspiration someone recently asked me how long it usually takes me to complete a design from first kernel of an idea (or dream) into production and then into my shops. My answer, not really meant to be flip was, "As long is it takes to FINALLY get it right". The ideas usually come quite easily, but the technical demands of actually constructing the design can be very challenging. It's frequently an extremely time consuming process to overcome problems and make the design actually work. My mind can visualize things, but figuring out how to persuade the polymer clay to DO IT is an entirely different matter! I make numerous mock ups and samples........ and my trash can constantly filled and overflowing. I save my "almost" samples and give them to the Boy's and Girl's club arts and crafts program, so at least I don't feel like the "oops learning experiences" are totally wasted.
Some of the raw materials and tools needed to make Mr Hound Dog.
I mention the time it takes to go from idea, to prototype, to reality for several reasons. People trying their hand at using polymer clay for the first time often seem to get frustrated because they can't create what their mind "sees" on the first try. I think one of the most wonderful things about polymer clay is the versatility of medium, but that characteristic also makes for a wide learning curve. It can takes a lot of trial and error to learn to make the clay "comply",....... and even then its more like the artist learning to compromise and come to grips with accepting what the clay actually WANTS TO DO on its own and make it a collaborative effort instead.

Customers who see a completed item and price tag often have no idea how long it might initially have taken to design the item, or how many prototypes hit the trash along the way. That's one or the reasons I've started to include behind the scenes studio photos with many of my shop listings. I'd like to try to help educate the consumer who likes buying handmade, but may not understand why things may cost more than the mass produced "Made in China" competition.
Hound Doggie in beaded chain version


Angel Hound Dog Hanging Ornament

Saturday, March 9, 2013

Daffodil Spring Cat and Eliminating the Bumpies when curing Polymer Clay

Introducing Daffodil Cat, the newest member of my Cat Collection who was inspired by the gorgeous blooming daffodils in our garden. When daffodils bloom can spring be far behind?
Entire Daffodil Cat Collection is now available at MelodyODesigns at Etsy
The daffodils in our garden that inspired me thriving beneath the Palo Verde tree
Bumpies, they have various innocuous names, but I call them the BUMPIES!#%^&*?!*. They are the small bumps that appear on the surface of raw polymer clay that are much more visible once the clay is cured. Bumpies are caused by tiny air bubbles that are trapped within the clay. The air can inadvertently become trapped when conditioning with a pasta machine, so it's wise to place the folded end into the rollers first. The cats I make require a sheet of FLAT clay without imperfections and when "cat acne" appears on a piece I'm making for sale it's VERY noticeable and is banished to the garbage can. I normally use PREMO clay, but there are some colors where I prefer to use Kato clay. In spite of taking care in conditioning I've found that no matter how much I've tried to prevent them, I get about 95% more bumpies when I use Kato brand than when I use PREMO.

I recently tried staircase or ramp curing, as recommended by both Jana Benzon Roberts and Tony Aquino (the chemist at Van Aken, the company which manufactures Kato) and I've found it very helpful. One puts the clay piece in a cold oven and cures at the lowest temperature for 20 minutes and then raises the temperature to 200 F for 20 minutes. Then, without opening the oven gradually increase the temperature 50 degrees every 10 minutes until the target temperature is reached and start timing of the actual curing time. For me, ramp curing seems to help a lot with PREMO, but not so much with Kato. I've seen an increase in the problem with both PREMO and Kato since they changed their formulas and I've noticed it's worse with mushy clay that needs leaching.

When I first encountered the problem, about 3 years ago, I contacted Tony. He suggested a "work around", but at the time it wasn't  practical to use it with my designs. This week, when my newly designed Daffodil Cats began sporting roaring cases of acne, I knew I'd either have to find a solution or discontinue using Kato, even if it meant changing my design. I am pleased to direct your attention to the Daffodil Angel Cat hanging ornament below. Look ma, no acne!
Daffodil Angel Cat Hanging ornament
So what did Tony suggest? It's really rather simple, but I think it's only practical to use with FLAT clay designs, like one might make from a flat clay sheet using a cookie cutter. I'm going to paraphrase his burnishing method of eliminating Bumpies adding my own suggestions to his. It seems to work even for clay sheets that were made from bits and scrap pieces flattened together in a pasta machine, a process notorious for producing Bumpies.

The following temperature recommendation and timing are for a piece of Kato clay that is the thickness of #1 Atlas or #5 D.R.E.A.M. pasta machine, roughly 1/8" (3.1mm) and must be adjusted according to the manufacturer's recommendations when using other brands and thicknesses.

Condition the clay any way you like. You don't even have to be TOTALLY meticulous about not introducing air into the clay, though it's a good idea.  Place your flat clay item on a piece of regular copy paper sitting on a ceramic tile, ideally cut to size. Place a slightly larger piece of paper on top of the clay item. Using your fingers, gently burnish the paper onto the top surface of the clay. If you rub too hard you risk distorting the shape of the clay. If you rub too little the paper won't totally adhere to the clay. Place in a pre-heated oven at 300 F for 30 minutes. 15 minutes into the curing time remove the paper from the top surface (careful, HOT!) and finish curing for the remaining 15 minutes. Once the piece comes out of the oven release it from the paper on the bottom (careful, HOT!)so that it doesn't curl as it cools.

According to Tony, "What is occurring is the paper is suppressing the ascent of the rising air bubbles and creating a detour. If there's not an outlet for it, it will not rise above the surface. It also mattes down the sheen, but sanding and buffing will provide an excellent gloss." I have found that using laser paper, which has a smoother surface than regular printer/copy paper lessens the matte occurrence and allows more of the characteristic Kato gloss to show without my having to take the time to sand and buff.
Daffodil Cat worn as brooch
Does the Burnishing Curing Method also work to prevent "Moonies", those light colored crescent shaped imperfections that are also caused by trapped air bubbles?  I don't know because I don't seem to get Moonies, but I would think it might. I'd love to hear from any readers who might try it for Moonies.
Readers tell me they enjoy seeing studio photos, so........
here is a photo of some of the various components that go into the making of the Daffodil Cats
EDITED UPDATE: Yesterday as I was "test driving" my new Daffodil Cat necklace by wearing it with a heavy winter sweater I thought, "Wouldn't it be nice if I could make a necklace variation that had a substantial beaded chain?" I had recently received a large order of colorful 8mm smooth round acrylic beads from Pedazos at Etsy and was thrilled to find I had PERFECT color matches already in my stash. I wore it this morning for the first time and I absolutely LOVE these colors together. There's something so optimistic and sunny about French Blue and bright yellow together.
Sunday, February 17, 2013

In Celebration of St Patrick's Day, Grandmother Connolly, Shamrocks and Polymer Clay Cat Jewelry


St Patrick's Day Angel Cat hanging ornament sporting his emerald green shamrock
When I was growing up I loved to celebrate St. Patrick's Day. I'd carefully choose my green outfit weeks in advance. I'd decorate the house with shamrocks and Leprechauns, play Irish music with my sister, and wear special St Patrick's Day jewelry that I'd make, myself. I was grateful that I could claim my Irish heritage from my great grandmother Connolly who had immigrated from County Cork.

A lot has changed since those days so long ago, but I still enjoy the celebration and our little town even has a St Patrick's Day parade. As part of my celebration this year I designed two St Patrick's Day additions to my Cat Collection. The first is an Angel Cat hanging ornament of emerald green and white with a shamrock dangling from his collar. The companion piece is a convertible pendant necklace/brooch.  Both are available at MelodyODesigns at Etsy
I always love to see other people's behind the scenes studio photos, so below I'm including two to share:
Kemper Heart Cutters make wonderful shamrocks. I use a syringe to more precisely place tiny appliques.

Friday, November 25, 2011

Dangling Red Cherry Bakelite Jewelry and Mom's Treasure Box


My faux vintage Bakelite inspired Red Cherry Necklace and other faux Bakelite cherry jewelry pieces including a Short Stem Necklace version and various color chain options, earrings, bracelet and Cherry Bar Brooch are available for sale at MelodyODesigns at Etsy

Mom had a jewelry box on her dresser. It wasn't fancy. Given that she grew up during the depression I think it might have been handmade by one of her brothers from simple stained pine wood. However, to me as a young child, that simple treasure box and it's contents were every bit as exciting as playing with the crown jewels might have been for some other child. It opened up a world of interesting shapes, textures and marvelous bright colors. I remember playing with the treasures in her box whenever I could manage to sneak a peek and dreaming of wearing them someday. I'd quietly clamber up on a chair to reach the dresser, open the lid on the jewelry box, and retreat into my own world. Ah, the colors! She liked the color blue a lot, but it was her collection of bright cherry red Bakelite pieces of the 1940's that totally captured my attention and imagination. I remember big chunky red earrings, awesome buttons, a red bangle bracelet, and.........


SOLD

a dangling yellow disc necklace, oh how I loved the many DANGLING pieces in her collection............


SOLD

and butterscotch hoop earrings.


At the end of my mom's life things were in chaos and I never found out what happened to her jewelry box and the contents. I can only hope that they ended up in the hands of someone who appreciated it as much as I did.

I had forgotten about the jewelry box and my love affair with red Bakelite jewelry until I saw two episodes of "Antiques Roadshow" on PBS. One featured the well-known vintage Cherry Jubilee necklace of bright red dangling Bakelite cherries and the other the classic Cherry Bar Brooch with suspended cherries. They made my heart sing. I desperately wanted to own them, however, they are in scarce supply, usually have extremely damaged stems and sell for a great deal of money ($500-$1,000+).............so...........I made my own reproductions using artist-quality polymer clay with sturdy green stereo wire stems, antique brass wire, and modern PVC chain. People noticed when I wore them and wanted their own, so...........

Nowadays I handcraft and sell reproductions of classic vintage Bakelite cherry jewelry at my shop. The reproductions remain true to the spirit of the originals and I'm proud to say that I discovered an uncredited photograph of my recent work (2009) in a gallery of online photos featuring the "best of the vintage Bakelite jewelry from the the 1940's"!

Red Cherry faux Bakelite necklace reproduction with green chain and whimsical tiny Ladybugs


Red Cherry faux Bakelite reproduction necklace in the Short Stem version

Red Cherry faux Bakelite Bar Brooch reproduction

Red Cherry faux Bakelite Earring reproduction Bold version

Red Cherry faux Bakelite Earring reproduction Dainty version

Red Cherry faux Bakelite Bracelet reproduction

Sunday, October 2, 2011

Christmas Cat Jewelry and Ornaments from Polymer Clay and Studio Photos

Here in Arizona the temperature was over 100 F. until just a few days ago, but holiday merchandizing and gift buying have already started. So lately, being a cat lover,  I've been spending many hours in my own version of Santa's Workshop surrounded by hues of bright red and green as I designed the prototype pendants, brooches and tree ornaments for the our holiday Cat Collection. I thought it would be fun to show photos of my workshop as I unveil the photos of Mr. Christmas Cat, himself.


First I conditioned a whole lot of artist-quality polymer clay with a dead blow hammer and kept two pasta machines busy as I made a large selection of canes using different colors, and color combinations. Then the canes were then reduced to of variety of different diameters and shapes. Caning is a labor-intensive construction technique borrowed from glass making similar to making jellyrolls, where colored rods of clay are laid horizontally forming a complex pattern from which a thin slice is cut allowing the pattern to be seen.


The next step was slicing up a whole passel of thin cane slices cut with a tissue blade.
(My favorite tissue blades are those sold by Carolyn Stearns  at Carolyn's Clay Creations)
 
Then the body and head pieces were cut out of sheets of various clay thicknesses using an oak tag template and a craft knife. The body is 2 dimensional, but the head which is eventually attached to the body is gently coaxed into 3 dimensional features by the addition of tiny logs and balls of clay on the back side of the head. Then the contours of the face are gently sculpted with rubber shaping tools and fingers encased in rubber gloves.
I also use one of my favorite tools made from ball bearings glued to a piece of bamboo to help with the sculpting process. I use the 1/4" end to help with the eye sockets.
And now for the moment you've all been waiting for.........Drum roll please............ta da........here's Mr Christmas Cat. The version below is that of a pendant style necklace that easily converts to a brooch by removing the satin cord. He and his friends come with either a red or green body in various jewelry and Hanging Ornaments in several styles and  colors are now available for "adoption" and gift giving at MelodyODesigns at Etsy 

To read more about the making of the ornaments please click Ornament Blog Post
Mr. Green Christmas Cat

Worn as Brooch


Clever jewelry  finding that converts from pendant to brooch


Monday, August 22, 2011

Halloween Black Cat Necklace to Brooch Jewelry from Polymer Clay

Of Halloween ghosts and goblins........ black and orange cats. Halloween merchandise in already in stores so I thought it was the perfect time to create an orange and black  Halloween cat pendant necklace that converts to a brooch. He's crafted from artist-quality polymer clay and decorated with *canes. His "cat like" eyes are made from a "brain cane" and he has brush bristle whiskers.  There is a innovative finding on the back that allows it to be worn as either a brooch or a pendant. His devilish smile reminds me a lot of one of our beloved black cats who used to take great delight in welcoming Trick or Treaters. The piece  was a featured item September 16, 2011 at CraftGossip.com 

*Caning is a labor-intensive construction technique borrowed from glass making similar to making jellyrolls where colored rods of clay are laid horizontally forming a complex pattern from which a thin slice is cut allowing the pattern to be seen.

Halloween Cat shown worn as a necklace pendant

Halloween Cat shown worn as a brooch
This Halloween Cat comes with clever finding that allows the piece to be converted from pendant necklace to brooch.
This versatile feline is also available as a magnet
                                  All the Halloween goodies are for sale at MelodyODesigns at Etsy


Tuesday, July 5, 2011

Orange Cat Polymer Clay Pin Pendant Necklaces

 Orange Cat convertible pin pendant is my new ArtFire avatar.

 Introducing our colorful, cheerful, charming, polymer clay Mr. Orange  Cat who is proud to have been chosen as the avatar for our new ArtFire studio shop.  He and the other bright and cheerful cats in our Cat Collection  were created to celebrate the joys of being owned by a cat. Except for the realistic whiskers, all the components of the pieces were made using PREMO polymer clay. Cane slices were applied to the raw PC body before it was cured using Liquid PC. The whisker are from a "faux natural bristle" hair brush and were made by curing the face  with small wires in place (the relative diameter of the hair brush bristle). After curing, the wires were  removed and the bristle was glued in the tiny hole with a tiny dap of "Zap-A-Gap" cyanoacrylic glue. The cats eyes are made from a "brain cane" reduced to a very small size. They are made entirely from artist-quality polymer clay and have a clever finding on their backs that allows them to be converted from a pendant to a brooch by simply removing the silky rayon cord. Mr. Orange Cat will be hanging out  at ArtFire along with a bevy of other colorful feline sidekicks waiting to be adopted and is for Cat Collection. (EDITED: Mr Orange Cat and some of his friends now hang out at MelodyODesigns at Etsy)

Convertible pin to pendant shown from the back.