Showing posts with label Faux. Show all posts

Saturday, May 14, 2016

MelodyODesigns Faux Bakelite Cherry Necklace Customer Appreciation Day Part 5, Nozomy


Valued Customer Nozomy looking vintage glamorous in her Faux Bakelite Cherry Necklace from MelodyODesigns at Etsy
Anita (the "Melody" in MelodyODesigns): I'm so blessed that I have the most special of customers and they are what drives my passion for my business. I recently found a wonderful and unexpected gift waiting for me when I happened to visit the blog of a lovely customer named Nozomy who had purchased my Short Stem Bakelite Cherry Reproduction Necklace a week earlier. She had enthusiastically written about her experience, complete with awesome photos. It was such a kind and thoughtful surprise that really made my day and still causes me to smile when I think about it. To read her "Cherry Story" in its entirety and see her photos of the experience, please clink Nozomy's tumblr blog.  I really love it when I have the opportunity to interact with customers. It fuels my creative juices and the Internet has made it possible to have contact with customers from all over the world.
The following is Nozomy's story in her own words of how her love affair with Bakelite jewelry began.

Nozomy:
"Essentially I love sparkly things as the many other girls do, but my only problem is that I have metal allergy. So I can never wear fashion jewelries, and had been wearing only silver, gold and platinum jewelries for decades. I am Japanese and I become obsessed with kimono which is Japanese traditional clothing 5 years ago, and then I moved to the US, next thing I fell in love was vintage fashion especially 40's and 50's is so fascinating. I started buying vintage dresses, purses, shoes, hats... but sadly never the fashion jewelries."

"One day, I found plastic-look fashion jewelries in a show case, and learned the word "Bakelite". I thought it was way pricey for the plastic, but now I've learned the value. Also I found out that there is Bakelite reproduction, they are more affordable and in perfect condition. I did a lot of research, and finally I found my dream cherry necklace on Etsy and that was made by Anita! I am looking forward to this coming summer to wear the cherry necklace and my summer cotton dresses!!"

Anita: As I read Nozomys blog I realized that she is a talented artisan, creating LOVELY, unique, and special crocheted and knitted fashions and accessories from her own designs that bring to mind vintage times gone by. I asked her about her pieces.

Nozomy:
"My grandma taught me how to crochet when I was 7 or 8 years old. Since then I have been keeping the hobby: I think I really like to knit and crochet! I came up with an idea to make crocheting accessories about 5 yeas ago, but I wasn't really serious and I made a couple of little flower earrings and I was done. I reconsidered to make them again 1 year ago, and then this time it came to real."
"I made earrings, hair combs of white flowers, strawberries and hollies for Christmas. All hand crocheted and starched. I made the pattern by myself. Everything is original and I don't think there'd be anything similar around the world."

"Also, these days I have been trying out vintage patterns, I especially love lace gloves because they are so pretty!!"
Nozomy: "I hope to own my shop selecting my original accessories and vintage pattern gloves/purses/hats in the future."

Anita: When Nozomy is ready to launch her shop, the info will be posted on her tumblr blog and I will also edit in the URL link here as well. I hope it happens soon, because I think her lovely, unique and special original design creations will attract many happy customers to her shop.

The seven pieces of my Faux Bakelite Red Cherry Jewelry Reproductions Collection are available at MelodyODesigns at Etsy

If you haven't already seen them you might also enjoy reading:

MelodyODesigns' Faux Bakelite  Cherry Jewelry Customer Appreciation Day Part 1

MelodyODesigns' Faux Bakelite Cherry Jewelry Customer Appreciation Day Part 2 

 MelodyODesigns' Faux Bakelite Cherry Jewelry Customer Apreciation Day Part 3


MelodyODesigns' Faux Bakelite Cherry Jewelry Customer Appreciation Day Part 4

Tuesday, June 5, 2012

Faux Chrysoprase, Chalcedony and Translucent Polymer Clay Test Results


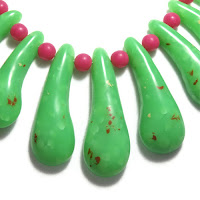
This Faux Chrysoprase and Fuchsia Chalcedony Necklace that I made from polymer clay is now available for sale at MelodyODesigns at Etsy
I love the look of mint green and fuchsia together. Considering that these colors are expected to be popular colors for spring and summer 2012, I decided to include them in my palette this season in the form of faux Chrysoprase (also known as Chrysophrase) and faux Fuchsia Chalcedony gemstones. They are made by hand from scratch using artist quality polymer clay. These two colors make me think of spring flowers and summer watermelon (not to mention pistachio nuts!)

In making the original prototype for the necklace I used Fimo Soft Translucent 014 as the neutral mixing base for the green chrysophrase, to which a a tiny amount of green and turquoise PREMO clay was added. I loved the sense of depth of the inclusions and plaquing with the Fimo Soft. Alas, the old Fimo Soft Trans is now discontinued and the new Fimo Effects 014 replacement is not the same formula and produces different results. In trying to find a permanent replacement for the Fimo Soft Trans to use in making faux chrysophrase I made dozens of samples over the span of a month, utilizing various brands, product lines, and vintages of translucent clays, trying to replicate the color and depth of my initial prototype necklace. I kept 29 of the best samples and I thought it might be interesting to show the results. Except for the three samples that are marked with color formula changes, all of the samples pictured below use an IDENTICAL COLOR FORMULA. The only variants are the brand/vintage of translucent clay and the curing temperature. My goal with the samples was to replicate the results achieved in an extra teardrop sample from my initial Fimo Soft necklace (marked with a red heart on the samples photo below).

Sample Test Result photos utilizing many brands and vintages of translucent polymer clay for making faux chrysophrase.

As a long time PREMO user I was surprised at my seeming inability to achieve sufficient plaquing in the two versions of PREMO Trans. I know that other people have reported success, but I have not yet figured out how, at least not when I WANT it to plaque. I seem to sometimes be able to get decent amounts when I DON'T want it to plaque!

I was amazed to see how much color variation there was even BEFORE curing just by changing the brand and vintage of the translucent base. The PREMO Frost (5317), and Fimo Effect produced a blue-green. The PREMO 5310, Fimo Classic, and Kato produced a yellow-green. What really blew me away was the EXTREMELY different color sample results between those I made from the old Fimo SoftTranslucent 014 in MY stash as compared to those made from the old Fimo Soft Trans 014 from Carolyn of CarolynsCreations (who generously gave up some of her clay stash so that I could make a 2nd necklace). Mine resulted in a lovely mint blue-green. Carolyn's resulted in a pretty yellow-green.

TEST RESULTS: The no longer available Fimo Soft (014) seems to have created the most visual depth, deep plaquing, and ability of the colored inclusions to delicately merge into the matrix. This was followed in order of increasing opaqueness by Fimo Effect, PREMO Trans (5310), PREMO Frost (5317, also known in the 2 oz size packages as PREMO White Translucent 5527), Fimo Classic (OO), and the nearly opaque Kato. I chose two Fimo Effect 014 samples as producing results that were the closest to my original Fimo Soft Trans prototype. They are grouped together and marked with a "BEST REPLACEMENT" with a yellow smiley face on the samples photo above.


To coax the most depth in the "fractured crackle" and plaquing out of the Fimo Effect samples, I initially froze the formed pieces and then immediately cured them in a pre-heated oven for a total of 30 minutes at decreasing degrees of heat:10 minutes at 290F., 10 minutes at 280F. and 10 minutes at 275F. The Fimo Effect Trans "winning sample" produced results that are not identical to those in my initial necklace#1, but it's still a winner. The old Fimo Soft Trans from Carolyn's stash produced very different results from the old Fimo Soft in my stash, but I think it will make a fine yellow-green jade sometime in the future.

For those readers who work with polymer clay and experience frustration trying to replicate the results with custom mixed colored clay formula recipes I have one more observation to share. In comparing the color of clay fresh out of the package of two 56g packages of Fimo Effect Translucent I noticed that there is clearly a difference in color, with one being slightly darker and slightly more yellow. I assume that the 8 digit number located away from the UPC code is the dye lot code, and the two packages have the identical code. Clearly, the results from custom mixing color formulas will vary if the neutral mixing base coming from the manufacturers isn't even identical.

FYI: The teardrop beads were created by starting with a carefully shaped and smoothed teardrop-shaped tinted polymer clay base bead. Tiny amounts of grated curls of colored clay (Raw Sienna and Ecru) were applied to the surface, one at a time, and then smeared into the surrounding area by hand to create the presence of small and realistic inclusions. The round faux chrysophrase beads were each also hand shaped and then inclusions were applied to the surface in a similar manner. Once the various components were cured, each was hand sanded with various grits of sandpaper (#360, #500, #1000, #2000, #4000) and then hand buffed, first using denim and then unbleached muslin.

I designed the following earrings to coordinate with the necklace (but they're not in my Etsy shop, please contact me if interested in purchasing.)


Coordinating earrings

Thanks go to Rob of Polymer Clay Express who patiently helped me understand the correlation between old and new stock numbers of both Fimo and PREMO trans, when the formulas changed, and how to identify the new formulas from the old in my stash.


Saturday, April 14, 2012

Faux Talavera Pottery Frog from Polymer Clay re-located to a Lily Pad Necklace

Several years ago I made a small faux Talavera pottery frog necklace from "Kato Liquid Polyclay" that had been inspired by a much larger authentic and very colorful Talavera pottery frog that sits on our back fence. The frog in the old necklace sat on a black speckled faux stone.

Faux Talavera pottery frog necklace pendant. 
However, though I'd tried many revisions to the piece over the years it never seemed quite "right", so I never sold it and eventually banished it to shadowy corner of my studio.  I'd more or less forgotten about the frog, (nicknamed Raulito at the time), until I happened to mention him to Chrissie,  an enthusiastic and talented new PC friend at the Delphi Polymer Clay Central Discussion Forum when she asked about making molds for use with polymer clay. Yesterday, after looking at the piece again with with fresh eyes I realized that perhaps he just needed a different kind of perch, perhaps a lily pad. Meet the new and improved Sr. Raulito Rana de Talavera who sleepily sits upon his bright green lily pad throne, majestically surveying his domain. 

He is currently for sale at MelodyODesigns at Etsy
To read the blog post about the making the FIRST polymer clay frog on the rock please click here:Faux Talavera Pottery Frog
 
Changes, adjustments, corrections, evolution,............this week as I gave my studio a spring cleaning I spent some pleasant time looking at the 15 years worth of poly clay prototypes tacked up on the 5 large midnight blue velvet covered bulletin boards that make up my display area. I found it interesting to re-visit my older pieces and note the evolution of style and the changes that have occurred to some of my designs over the years. I'm sometimes frustrated because I can have an annoying tendency to be quite resistant to change (especially so, when the changes involve polymer clay companies making changes to their formulas!). Yet, one's reaction to change and the act of creatively working out solutions is how life lessons are learned. The polymer clay learning curve,............... a metaphor for life.

Monday, February 27, 2012

Red Rock + Turquoise Necklace, How Gary Austin's Mesquite Pot Inspired it

Faux Red Rock and Faux Turquoise 'Tribute to Sedona' Necklace
Faux Red Rock and turquoise inlay necklace inspired by a woodturned mesquite and turquoise pot by Gary Austin
I recently completed this faux red rock sandstone with faux turquoise inlay and faux turquoise bead necklace that's made entirely by hand from artist quality polymer clay as a tribute to the red rocks of nearby Sedona, Arizona. The matrix even contains small amounts of real powdered Sedona red rock dirt. I love the way cerulean blue Arizona turquoise and red sandstone compliment each other. Very Arizona! My original inspiration for the turquoise inlay in the cracks of the teardrops, however, didn't come from Sedona. It was indirectly inspired by the unlikely source of a gorgeous woodturned pot made from mesquite wood elaborately that is Inlaced with turquoise. It was created by Thatcher, AZ artist and woodturner, Gary Austin. My husband bought it for me after I fell in love with it at the Little Art Gallery in Thatcher, Arizona. 
(More about inspiration in general at the end of the post and a call for polymer clay artists to share the sources of their inspiration in a future blog post here.)


Woodturned Mesquite Burl Pot with Turquoise Inlace by Gary Austin

I was lucky enough to have the opportunity to meet and talk Gary, who happened to be in the gallery at the time, and find out a little bit about the process he uses to create his masterpieces. The turquoise Inlace follows the crevices in the mesquite and forms an intentional, but seemingly random meandering pattern that's very organic in nature and pleasing to the eye. This pot is one of the most beautiful pieces of artwork I've ever seen and it fits in perfectly with the earthy southwest theme of our home. It now lives in our dining room where we can enjoy it while we eat. The pot inspired me to try my hand at incorporating faux turquoise into the crooks and crevices of my stylized polymer clay faux sandstone teardrops.  

Because I'm so attracted to Gary's work and it inspired me, I wanted to share a bit about him and his work in hopes of also inspiring my readers. Below are pictures of a few of my favorite Gary Austin pieces and a short bio.

       China Berry Burl

Mesquite Burl
Gary was born in Arizona and has lived his whole life in our beautiful state. He attended school in Eagar. After high school he received a BS Degree from Arizona State University in Education with a certificate in Special Education. He and his family moved to Thatcher where he was a Special Education teacher for 35 years, teaching in the Elementary School, Middle School and High School. He is now retired from teaching.

Gary Austin and his prize-winning woodturned pots

He has been turning wood for about eight years. He got started by taking a wood working class at the local college. Even though Gary was building a computer table, he was very interested in the little bowls the instructor's son was making on the lathe. When Gary finished his computer table the instructor told him to make a bowl. Gary said,  "I don't have any wood." The instructor gave him some and he has been turning ever since. He has turned over 1100 pieces. His progress has been impressive. He writes that, "his first turned piece was segmented and looked like a spittoon." Like many top wood turners, he now uses other types of material to accent various aspects of his work, such as  turquoise Inlace (the turquoise colored inlay material used in the pots). He has created many magnificent pieces, both small and large, and prefers whole wood as apposed to segmented. He says that he really likes to show the holes, cracks and natural lips of the wood whenever possible and it's easy to see from the photographs of his work that he utilizes them in a spectacular way with a master's eye and touch.

Oak Burl

From the beginning Gary has exhibited the ability to been able to read the wood, i.e. having the eye and the creativity to being able to get the best shape and grain from each piece.  Almost all the woods he uses are native to Arizona and the majority are desert woods. His favorite woods are Mesquite, Oak, and Black Walnut.

 Oak Burl

He writes that, "he loves that people love his turned pieces and he has never turned a piece that he didn't like." I love his work and I've never seen one of his pieces that I didn't like, either!


I find that inspiration can come from so many diverse sources and it's often takes a serendipitous route. It's very interesting to step back and become more aware of the sources of creative inspiration and I find it's also very interesting to see where people's inspiration comes from. So, for those readers who work with polymer clay as their medium of choice, I'm soliciting/collecting photos of polymer clay pieces along with an accompanying photo of the source of their inspiration (either indirect or direct) to be used for a future blog post on inspiration.  


Send me a photo of your final polymer clay piece along with a photo of the inspiration behind it, plus a few sentences of storyline if you like. I'll include as many as I can in a future post. If you'd like your contact info to be published (name as you'd like it to appear, website/shop/blog) please include that info. If the inspiration came from a piece by another artist, please make sure you have permission from that artist for me to post it and also include their contact info (name as they'd like it to appear, website/shop/blog) if they'd like that info to be included in the post.

BTW, I just became INSPIRED to add a Feedburner email sign up to my blog so that if you choose, anytime I make a new blog post it will arrive directly in your email inbox. See top right to sign up by leaving your email address. I've also enabled Reader feed and there's now a sign up for that, too, in case you prefer to subscribe to the blog in a reader format. A big Thank You to Lynn of DesertRubble for her blog post on "How to Email Blog Posts to You Fans" and for her guidance in helping me set up my Feedburner.

Saturday, March 13, 2010

Faux Talavera Pottery Frog Pendant from Polymer Clay

EDITED: A New updated version of this pendant with the frog on a lily pad is now available for sale. Please click here to read about it: Frog on lily pad

I fell in love with a 2 foot long vintage pottery frog from Talavera, Mexico the first time I saw him and he now lives on our back fence (shown below). His name is Raúl and he was the inspiration behind my 2 inch version. My mini frog (Raulito) was first sculpted in Kato polyclay and then a mold of the cured piece was made from "Amazing Mold Putty", a bakeable silicone-based molding compound. "Kato Liquid Polyclay" (Kato LPC) was poured into the mold to make the final frog. 

EDITED May 4, 2012: FYI both NEW formula Kato clay and NEW formula Kato Liquid Polyclay may no longer be compatible to use with Amazing Mold Putty. In my recent experiments/experience I have found that "Amazing Mold Putty" would not set up when creating molds from pieces that had been sculpted from Kato clay, but would set up when molding pieces made from PREMO. 

ALSO, I recently found that  new formula "Kato Liquid Polyclay" (well mixed) that was poured into molds made of "Amazing Mold Putty" consistently did not cure normally. They all cracked while still in the mold and were extremely fragile, even with samples cured at a variety of different temperatures (275-310F.) for up to 2 hours.  Mold pulls made with old formula "Kato Liquid Polclay" cured normally. I believe that the "new" formula "Kato Liquid Polyclay" can be identified by K1 or KL printed on the label located above the bar code. Mold pulls made from "Translucent Liquid Sculpey"(TLS) cured properly. 

*Note: I realize it is possible that I got a defective bottle  of NEW "Kato Liquid Polyclay". To be sure of the results , I will have to try identical  experiments with another unopened bottle, but the contents of my current bottle worked fine for other typical liquid clay applications

Once cured, the frog was painted with a mixture of 8 parts Kato LPC to 1 part "Genesis Heat Set Oil Paint" and dried to touch with a crafter's heat gun as I worked (not too close and continually moving the heat gun to prevent burning). Once painted,  PC appliques were added using the Kato LPC as "glue". Then the entire frog was cured (tented) for only 15 minutes at only 275F (to prevent browning of the light colors).

Two coats of Kato LPC were added to mimic ceramic glaze, each coat heat gunned, then oven cured, then heat gunned again.  Then three VERY THIN coats of glossy Varathane varnish were applied using a slightly moistened foam makeup sponge that had been dipped in water and then gently wrung out. Each Varathane coat was heat set at 205F. for 5 minutes.

The "rock" base was made with Sculpey "Utlralight" poly clay and covered with a thin veneer made from thin torn sheets of black PREMO (PM#3) with inclusions of grated transulucent and white PC and white embossing powder.  The raw clay was textured with very coarse sandpaper. Because of the light weight of the "Ultralight",  the entire piece only weights 2 1/2 oz, much to the surprise of people who pick it up.